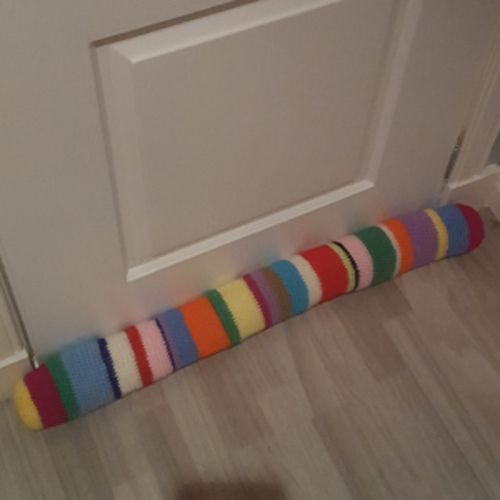
Crocheted Draft Excluder

One of my first free-hand creations was born from the arrival of two things: a bitterly cold Scottish winter and a bumper pack of multicoloured yarn. Having just received my rainbow delivery and curious as to what they looked like when in use, I grabbed the only hook I owned at the time (4mm) and got to work on a draft excluder that would put Joseph’s Technicolour Dream Coat to shame. As I went I tried to incorporate every different colour in the bumper pack (some were duplicates which is always a possibility when buying bumper packs) as well as randomising both colour and width of each block; which is a lot harder than you might imagine. The end result wasn’t the prettiest by no means but it was an experimental project and one that I enjoyed learning new techniques on, while also resulting in a practical item that is still in use today.
As I started out making this I opted for the easiest of options and just crocheted in the round. Meaning no fancy techniques were needed to join one round to the next, no need for stitch markers (which I didn’t even know were a thing at the time, to be honest), and no real plan of any form. Just a magic circle (difficult enough) and single crochet (UK double) were all that needed to know.
As the draft excluded started to form and as I made my changes from one colour to another, I came to experience what is called a travelling seam. Something that naturally occurs when crocheting in the round, whereby your joining seam between rounds travels to the right, if you’re right-handed, or to the left, if you’re left-handed.
To make things easier we are crocheting in the round here, which means we don’t need to do anything fancy to join one round to another. So, if you plan on doing this in just one colour, or you have no set plan on where you wish to change colours you don’t have to bother with a stitch marker for this project. Just keep crocheting until your project is long enough, or until you feel it’s time to change your colour.
That being said, please note that your colour changes will have a slope to them
Should you wish to use a stitch marker, however, I like to place mine in my first stitch because I find identifying the first stitch from a magic circle to be tricky sometimes but I know some who like to place it in their last. Each work just the same as long as you are consistent and remember if it’s marking the start or the end of your round. So feel free to place it where you wish.
Just keep crocheting stitch after stitch, replacing that stitch marker in your first of last stitch to mark the round. That being said
Materials
- 4mm hook (US G)
- Stitch Marker
- Double Knit yarn (weight 3) in one or multiple colours
Details
The pattern for my draft excluder is written in US crochet terms. Yes, I’m from the UK but they are what I learnt first, and personally, it’s how my brain default reads any pattern. I will create a page to define the difference and provide the link later. In the mean time, when you see single crochet that’s a UK double.
Key:
SC single crochet
sts stitches
st stitch
rep repeat
Draft Excluder Pattern:
Round 1: Create a magic circle and SC 6. (6 sts)
Round 2: 2x SC in each st. (12 sts)
Round 3: [2x SC in first st, 1x SC in second st] rep x 6. (18 sts)
Round 4: [2x SC in first st, 1x SC in the next two sts] rep x 6. (24 sts)
Round 5: [2x SC in first st, 1x SC in the next three sts] rep x 6. (30 sts)
Round 6: [2x SC in first st, 1x SC in the next four sts] rep x 6. (36 sts)
Round 7: [2x SC in first st, 1x SC in the next five sts] rep x 6. (42 sts)
Round 8: [2x SC in first st, 1x SC in the next six sts] rep x 6. (48 sts)
Round 9: [2x SC in first st, 1x SC in the next seven sts] rep x 6. (54 sts)
